
The key to cardio with bad knees is not avoiding activity, but learning to manage forces on the joint.
- The “best” machine (elliptical vs. bike) depends entirely on the specific location of your knee pain.
- Proper technique in activities like swimming or walking can be more important for knee health than the choice of exercise itself.
Recommendation: Stop the “no pain, no gain” guesswork. Adopt a 2/10 pain scale rule: if your pain exceeds a 2 out of 10 during an activity, it’s a signal to modify or stop.
The feeling is deeply frustrating. You want to get your heart rate up, lose weight, and feel healthier, but a sharp, aching, or grinding pain in your knees stops you every time. You’ve likely heard the standard advice: “just swim,” “use the elliptical,” or the all-too-vague “listen to your body.” While well-intentioned, this advice often fails because it misses the fundamental issue. It treats all knee pain the same and focuses only on *what* exercises to do, not *how* to do them safely.
The truth is, getting effective cardio with compromised knees is not about simply choosing a “low-impact” activity. It’s about understanding and managing the specific forces your joints are subjected to. This requires a shift in mindset from avoiding impact to mastering movement. Instead of just giving you a list of exercises, this guide provides a physical therapist’s framework for understanding the biomechanics at play. It’s about learning why one machine might be better for your specific condition than another and how to use precise techniques to build cardiovascular endurance without setting back your joint health.
This article will guide you through a rehabilitative approach to cardio. We will deconstruct common exercises, identify the hidden mistakes that lead to pain, and provide actionable protocols to help you finally achieve your fitness goals safely and effectively. You will learn to become an expert on your own body, making informed decisions that protect your knees for the long run.
Summary: A Physical Therapist’s Guide to Cardio with Bad Knees
- Why Running on Concrete Destroys Knees and What Surfaces Are Safe?
- How to Swim for Cardio Without Hurting Your Neck?
- Elliptical vs Bike: Which Is Better for Arthritic Knees?
- The “No Pain No Gain” Mistake That Leads to Surgery
- How to Reach Zone 2 Cardio Without High Impact Jumping?
- Hotel Gym vs Room Workout: Which Is More Likely to Happen?
- Why Walking the Last Mile Is Costing You 2.5 Hours a Week?
- How to Maintain a Healthy Diet While on Regular Business Trips?
Why Running on Concrete Destroys Knees and What Surfaces Are Safe?
For individuals with healthy knees, running is a fantastic cardiovascular workout. However, for those with pre-existing joint issues, it can be a direct path to further damage. The primary reason lies in a concept called ground reaction force. Every time your foot strikes the ground, a force equal to several times your body weight travels up your kinetic chain—from your foot, through your ankle, and directly into your knee joint. The surface you run on dramatically alters the magnitude of this force.
Hard, unforgiving surfaces like concrete and asphalt offer almost no shock absorption. This means your joints and soft tissues must absorb the full brunt of the impact. A 2023 study analyzing running impacts found that running on concrete produces significantly higher impact forces compared to softer alternatives. This constant, high-impact loading can accelerate cartilage wear, increase inflammation, and exacerbate conditions like patellofemoral pain syndrome and osteoarthritis.
To manage these forces, choosing the right surface is critical. If you must run or jog, prioritize surfaces that offer natural cushioning. These include:
- Grass or dirt trails: These are among the best options, as they naturally dissipate impact forces.
- Synthetic running tracks: The rubberized surface is specifically engineered for shock absorption.
- Treadmills: A quality treadmill has a cushioned deck designed to reduce impact compared to outdoor pavement.
By switching from concrete to a softer surface, you are not eliminating impact, but you are effectively reducing its peak force, giving your knees a much-needed reprieve and making the activity more sustainable.
How to Swim for Cardio Without Hurting Your Neck?
Swimming is often heralded as the perfect exercise for bad knees, and for good reason. The buoyancy of water removes impact forces almost entirely, allowing for a fantastic cardiovascular workout without stressing the lower body joints. However, many people trade knee pain for a new problem: a stiff, aching neck. This is almost always caused by improper breathing technique during the freestyle stroke, where the head is lifted or twisted in isolation from the body.
The solution lies in mastering the body roll. Instead of just turning your head to breathe, you should rotate your entire torso as a single, solid unit, like a log rolling in the water. Your head should stay in line with your spine, and as your body rotates, your mouth will naturally clear the water to take a breath. This technique keeps the cervical spine in a neutral position, preventing the muscular strain and joint compression that cause neck pain.
This image demonstrates the correct alignment, where the spine and head form a straight line during the rotation for a breath.
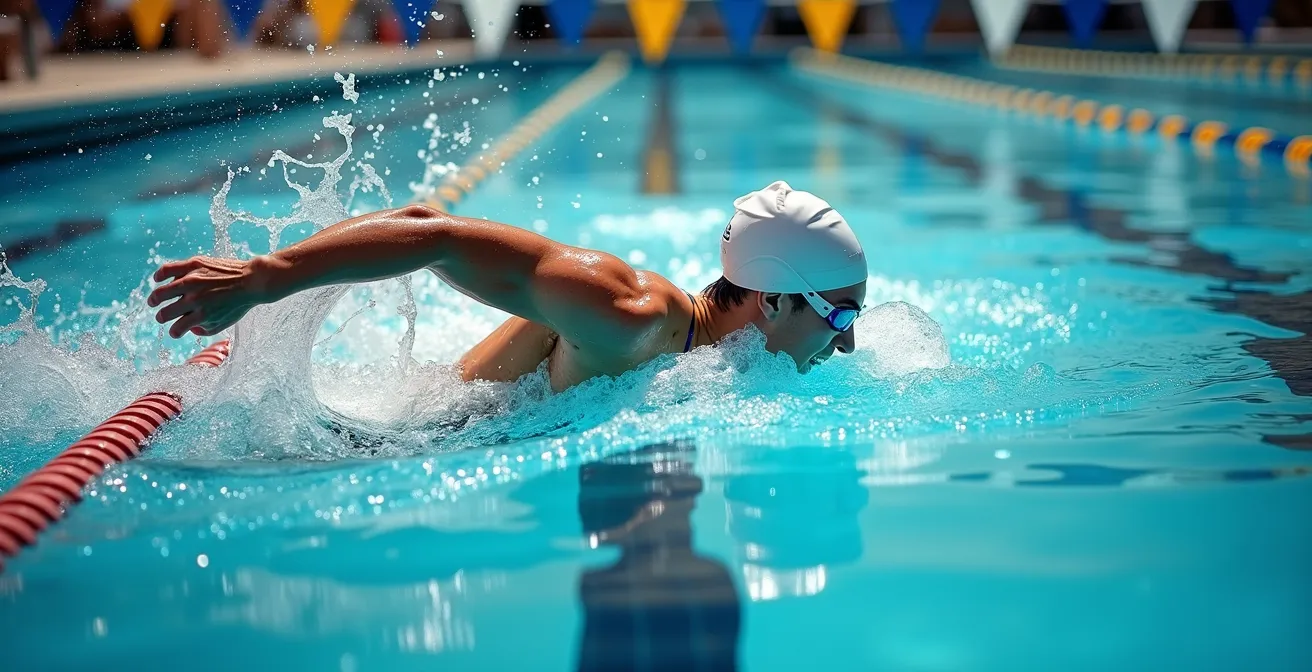
To develop this skill, focus on rotating from your hips and core, not your shoulders. Bilateral breathing (breathing every three strokes, alternating sides) is an excellent drill to promote symmetrical rotation. It may feel awkward at first, but mastering the body roll is the key to unlocking swimming as a truly pain-free, full-body cardio workout.
- Start with bilateral breathing every 3 strokes to encourage equal rotation.
- Focus on rotating from your core, not just your shoulders.
- Keep your head aligned with your spine—imagine a steel rod through your body.
- Turn your entire torso as one unit when breathing.
- Practice with a kickboard under one arm to isolate rotation mechanics.
Elliptical vs Bike: Which Is Better for Arthritic Knees?
The debate between the elliptical and the stationary bike is a common one in any gym. Both are excellent low-impact options, but for someone with arthritic knees, one is not universally “better” than the other. The right choice depends on the specific location and nature of your knee pain. This is where understanding biomechanics becomes a powerful tool for self-management.
A stationary bike, particularly a recumbent bike, places your knee in a closed kinetic chain. This means your foot is fixed to the pedal, creating a predictable and stable path of motion. This stability is often highly beneficial for general arthritis and especially for people with patellofemoral pain (pain around the kneecap). The elliptical, on the other hand, is an open-chain exercise where your foot is not fixed, which can sometimes be better for other specific issues.
Clinical Findings: Machine Choice and Pain Location
A clinical study on patients with knee arthritis highlighted this exact nuance. It found that recumbent cycling reduced stress on the patellofemoral joint by 39% compared to the elliptical, making it a superior choice for kneecap-related pain. However, for patients with issues on the side of the knee (like MCL-related problems), the elliptical led to 28% better outcomes because its movement pattern reduced lateral stress. The takeaway is clear: the “best” machine is the one that matches your specific joint’s needs.
Regardless of your choice, proper setup is non-negotiable for protecting your knees. Incorrect seat height on a bike or an unnatural stride on an elliptical can introduce new stresses and cause pain. Following a setup checklist ensures the machine is working with your body, not against it.
Your Action Plan: Optimal Machine Setup
- Bike Setup: Adjust the seat height so there is a 25-30 degree bend in your knee when the pedal is at its lowest point.
- Bike Setup: Position the handlebars level with the seat to maintain an upright posture and reduce stress from leaning forward.
- Elliptical Setup: Choose a machine with a stride length that matches your natural walking gait (often 18-20 inches) to avoid overstretching.
- Elliptical Setup: Keep the incline set to 5% or less to minimize compression forces on the patellofemoral joint.
- Both Machines: Always begin with a 5-minute warm-up at minimal resistance before gradually increasing the intensity.
The “No Pain No Gain” Mistake That Leads to Surgery
One of the most dangerous myths in fitness, especially for those with joint pain, is the “no pain, no gain” philosophy. While muscle soreness after a workout is normal (this is called Delayed Onset Muscle Soreness or DOMS), sharp, stabbing, or grinding pain within the joint itself is not. It is a warning signal from your body that you are causing damage. Pushing through this type of pain can turn a manageable condition into a chronic one, and in some cases, can accelerate the need for surgical intervention.
From a rehabilitative perspective, pain is data. It tells us when a movement is harmful or when the load is too high. Ignoring this data is like driving a car while ignoring the “check engine” light. The goal of exercise should be to challenge your cardiovascular system and muscles, not to irritate and inflame your joints. The mantra should be “challenge, don’t damage.”
To replace the “no pain, no gain” guess-work, physical therapists use a simple but effective tool: the 2/10 Pain Rule. This provides a clear, objective framework for making decisions during your workout. It empowers you to listen to your body in a structured way, ensuring you stay in a safe and productive zone.
- Rate your knee pain on a scale of 0-10 during exercise (0 is no pain, 10 is the worst imaginable).
- 0-2/10 (Safe Zone): This is an acceptable level of discomfort. You can continue exercising with good form.
- 3-4/10 (Caution Zone): Your pain is increasing. It’s time to reduce your intensity, decrease your range of motion, or switch to a different exercise.
- 5-6/10 (Stop Zone): This is a clear signal to stop the activity. Continuing risks inflammation and injury. End your session and consider applying the RICE protocol (Rest, Ice, Compression, Elevation).
- 7+/10 (Medical Zone): This level of pain warrants ceasing all activity and consulting with a healthcare provider.
By consistently applying this rule, you learn to work right up to the edge of your capacity without crossing into the territory of damage. It’s a fundamental shift that prioritizes long-term joint health over short-term intensity.
How to Reach Zone 2 Cardio Without High Impact Jumping?
Zone 2 cardio, often described as a pace where you can hold a conversation, is celebrated for its ability to build endurance and improve metabolic health. The challenge for people with bad knees is that achieving and sustaining this heart rate zone (typically 60-70% of your max heart rate) is often associated with jogging or other high-impact activities. Fortunately, you can absolutely get into Zone 2 without any jumping at all by using resistance and a strategy called “cardio stacking.”
The key is to understand that your heart rate responds to muscular work, not just impact. By using low-impact machines with moderate resistance, you can force your large muscle groups (like your quads, glutes, and back) to work harder, which in turn drives up your heart rate. Studies on low-impact HIIT demonstrate that high-resistance intervals on stationary bikes can elevate heart rate to 85-90% of maximum, proving that intensity can be achieved without impact. For Zone 2, you simply use a more moderate, sustained resistance.
Cardio stacking involves moving between different low-impact activities within a single workout session. This prevents overuse of any single joint or muscle group and keeps the workout engaging. It also ensures different muscles are recruited, providing a more comprehensive conditioning effect. A well-designed session can easily keep your heart rate in the Zone 2 range for 40-50 minutes.
- Warm-up: 5 minutes of walking at a conversational pace.
- Block 1: 15 minutes on a recumbent bike at a moderate resistance that feels like a 5-6/10 on a Rate of Perceived Exertion (RPE) scale.
- Block 2: 15 minutes on a rowing machine, focusing on a powerful leg drive to initiate the stroke (RPE 5-6).
- Block 3: 10 minutes of water walking or aqua jogging in a pool (RPE 5-6).
- Cool-down: 5 minutes of gentle stretching for the quadriceps and hamstrings.
This protocol provides a full 40 minutes of varied, joint-friendly work squarely in the Zone 2 training window, all while giving your knees the protection they need.
Hotel Gym vs Room Workout: Which Is More Likely to Happen?
Maintaining a fitness routine while traveling is a major challenge, and for those with bad knees, the obstacles are even greater. The choice often comes down to two options: brave the often-unpredictable hotel gym or try to put together a workout in your room. While the gym may seem superior, the “best” workout is always the one you actually do. Consistency trumps intensity, especially on the road.
The hotel gym can be a minefield. You might find a high-end facility with a new recumbent bike and a pool, or you could be met with a single, rickety treadmill on a high incline. Before you even change into your workout clothes, it’s wise to perform a quick 5-minute audit of the gym to see if it can accommodate your needs. If the equipment is old, broken, or high-impact only, a room workout is the safer and more effective choice.
A room workout, while seemingly limited, can be surprisingly effective for maintaining cardiovascular fitness and muscle tone. The key is to focus on low-impact, bodyweight-based movements that can be done in a small space. With a single piece of portable equipment like a resistance band, you can create a circuit that keeps your heart rate elevated without stressing your knees.
Case Study: The 20-Minute Hotel Room Circuit
A business traveler with chronic knee pain designed a simple 20-minute circuit for his hotel room using only a resistance band. The routine consisted of continuous movement through seated shadow boxing, wall sits, resistance band glute walks (walking sideways), and bird-dog holds. By minimizing rest between exercises, he was able to maintain a heart rate of 120-130 bpm throughout the session. After six weeks of consistent travel, he reported a 60% decrease in his daily knee pain, proving that a simple, consistent, in-room routine can be more beneficial than an inconsistent, potentially risky gym session.
Ultimately, the most likely workout to happen is the one with the fewest barriers. Having a pre-planned, equipment-light room workout in your back pocket ensures you always have a safe, joint-friendly option, no matter what the hotel gym looks like.
Why Walking the Last Mile Is Costing You 2.5 Hours a Week?
Walking is one of the most accessible forms of exercise, but for those with bad knees, even this simple activity can become a source of pain. The common assumption is that if walking hurts, you should stop. However, a more effective approach is to improve *how* you walk. Poor walking mechanics, characterized by over-striding and weak glute activation, can place excessive strain on the knee joint. By refining your technique, you can transform walking from a painful chore into a therapeutic activity.
A major flaw in many walking patterns is being “quad dominant,” where you pull yourself forward with the muscles on the front of your thigh. The correct way is to be “glute dominant,” using the powerful muscles in your buttocks to push yourself forward. When you actively squeeze your glute at the end of each step, you create a more powerful and efficient stride that takes a significant load off the knee joint.
To further reduce joint stress, consider using Nordic walking poles. This turns your walk into a full-body workout and significantly offloads your lower body. Biomechanical research shows that Nordic walking poles can reduce the load on your lower joints by up to 30% while simultaneously increasing your calorie burn by 20% compared to regular walking. That combination of reduced impact and increased intensity is a huge win for anyone with knee pain.
Focusing on a glute-activated walking technique can feel strange at first, but practicing it during interval walks can help build the new motor pattern:
- Focus on pushing off with your back foot rather than pulling with your front leg.
- Consciously squeeze your glutes at the end of each step, just before the back foot lifts off.
- Keep your core engaged and maintain an upright posture.
- Land with a gentle heel strike and roll through the foot to push off with the big toe.
- Practice with intervals: 4 minutes of brisk walking focusing on this technique, followed by 2 minutes of recovery-paced walking.
Key Takeaways
- Force Management Over Impact Avoidance: The goal isn’t just to find low-impact exercise, but to choose activities and surfaces that help you manage forces on the knee joint effectively.
- Adopt the 2/10 Pain Rule: Replace the “no pain, no gain” mindset with a structured pain scale. If pain exceeds a 2/10 during an activity, it’s a signal to modify or stop.
- Technique is Paramount: How you perform an exercise (e.g., body roll in swimming, glute activation in walking) is often more important for joint health than the exercise itself.
How to Maintain a Healthy Diet While on Regular Business Trips?
While exercise is a critical piece of the puzzle for managing knee pain, it’s only half the battle. Your diet plays an enormous role in your body’s level of systemic inflammation, which can directly impact how your joints feel. For frequent travelers, maintaining a healthy, anti-inflammatory diet can feel impossible amidst airport food courts and business dinners. However, with a little planning, you can make choices that support your joint health instead of undermining it.
The goal is to prioritize foods rich in anti-inflammatory compounds like omega-3 fatty acids, antioxidants, and polyphenols, while avoiding pro-inflammatory culprits like sugar, processed foods, and unhealthy fats. This starts before you even leave for the airport. Packing an “emergency snack kit” with items like raw almonds, dried cherries, and low-sugar protein bars can save you from making poor choices when hunger strikes.
Hydration is another frequently overlooked but critical component. Your joints are lubricated by synovial fluid, which is largely composed of water. Dehydration can reduce the volume and effectiveness of this fluid, increasing friction within the joint. Clinical studies on hydration and joint health show that even mild dehydration (as little as 2%) can increase joint friction and significantly amplify the perception of pain. The dry, recirculated air on airplanes is especially dehydrating, making a consistent hydration schedule essential for travelers.
Navigating travel menus becomes easier with a simple guide:
- Airport/On-the-Go: Look for green tea, mixed berry cups, and unsalted nuts. Avoid pastries and sugary coffee drinks.
- Hotel Breakfast: Choose oatmeal with walnuts and blueberries over sugary cereals, pastries, or bacon.
- Business Dinners: Opt for grilled fish like salmon (rich in omega-3s) with a side of steamed vegetables. Politely decline the bread basket and skip creamy sauces.
- Hydration Plan: Drink a glass of water every hour during flights, another upon waking, and one before each meal to manage hunger and support joint health.
By integrating these principles of force management, structured pain monitoring, and anti-inflammatory nutrition, you can build a robust and effective cardio routine that strengthens your body without harming your knees. Start today by choosing one strategy from this guide to implement in your next workout.