In summary:
- Identify and seal hidden air leaks caused by the “stack effect,” not just obvious window gaps.
- Use low-cost window films and strategic heating cycles based on your home’s thermal mass.
- Control humidity with “purge ventilation” to eliminate the “damp cold” feeling.
- Prioritize improving the building’s “fabric” (sealing, insulation) before investing in expensive systems.
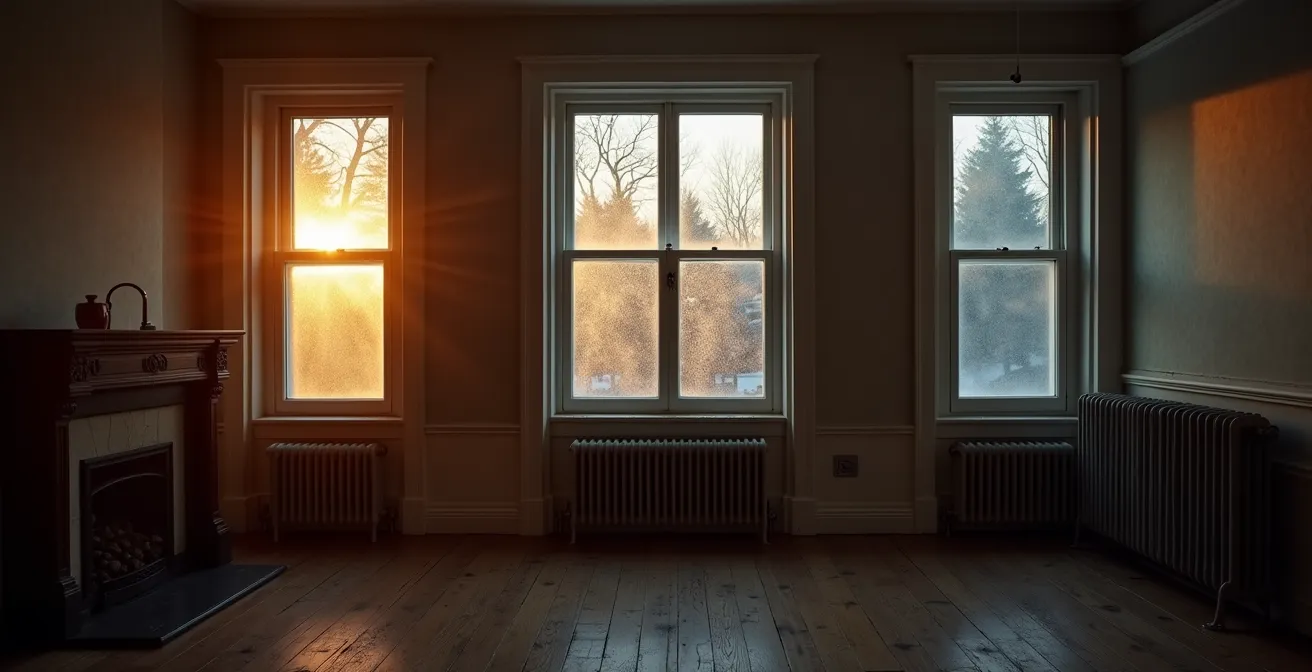
If you live in an older property, you know the frustration. The heating is on, the bills are climbing, yet a persistent chill lingers in the air. You’ve checked the windows, maybe even added thicker curtains, but the drafts remain, making your home feel perpetually uncomfortable. This feeling of wasting money to stay cold is a common problem for owners and tenants of period homes, leading many to believe that expensive renovations are the only solution.
The conventional wisdom tells you to caulk windows and weatherstrip doors. While these are valid steps, they often only scratch the surface of the problem. They fail to address the invisible dynamics at play within your home. The real culprits are often misunderstood principles of physics: air pressure, thermal mass, and humidity. These factors conspire to pull cold air in and push expensive warm air out, no matter how high you set the thermostat.
But what if the key to a warmer home wasn’t just about blocking obvious holes, but about understanding and outsmarting the airflow itself? This guide moves beyond the generic advice. As an energy efficiency auditor, our focus will be on the technical, practical, and money-saving strategies that tackle the root causes. We will explore the “stack effect,” learn how to manage your heating for maximum efficiency, and even discover why strategically opening your windows for a few minutes can make your house feel warmer.
This article provides a systematic approach to transforming your old house from a drafty, expensive-to-heat space into a thermally comfortable and efficient home. We will break down the science into actionable, low-cost steps, giving you the tools to conduct your own mini-audit and implement high-impact changes without needing a major renovation budget.
Summary: A Technical Guide to a Warmer Old House
- Why Your Heating Bill Is High Even Though the Windows Are Closed?
- How to Apply Window Film to Mimic Double Glazing for Under $50?
- Constant Low Heat vs On-Off Blasting: Which Saves More Money?
- The Ventilation Mistake That Makes Your Warm House Feel Cold and Damp
- When to Bleed Your Radiators: The Sign That You Are Wasting Gas
- How to Use Any Window for Free Solar Heating
- The Psychological Hack: How Natural Light Makes a Room Feel Warmer
- The “Fabric First” Rule: Why Insulation Beats Solar for Immediate Savings
Why Your Heating Bill Is High Even Though the Windows Are Closed?
The primary reason your old house feels drafty, even with sealed windows, is an invisible force known as the “stack effect.” This phenomenon is driven by simple physics: warm air is less dense than cold air, so it naturally rises. In your home, the warm air generated by your heating system rises to the upper floors and leaks out through tiny gaps in the attic, roofline, or around upstairs window frames. This outflow of air creates a negative pressure zone, or a vacuum, in the lower levels of your house. This vacuum is powerful, and it actively pulls cold outside air inwards through any available crack or opening—around baseboards, electrical outlets, plumbing penetrations, and even through unsealed crawl spaces.
You are essentially running a giant, inefficient chimney. You pay to heat the air, it rises and escapes, and in doing so, it pulls in more cold air that you then have to pay to heat. This cycle explains why you can feel a draft at your feet even when you’re far from a window. Tackling this requires a shift in mindset: instead of just sealing windows, you need to think like a detective and find all the hidden air infiltration points at the bottom of your home and exfiltration points at the top. Properly air sealing a home to mitigate this effect is a high-impact strategy. In fact, it’s estimated that homeowners can achieve an upward of 20% average savings on heating and cooling bills simply by controlling these air leaks.
The first step is to locate these hidden drafts. Instead of randomly applying caulk, a systematic approach will yield far better results. You must identify where the cold air is entering at the lowest levels (infiltration) and where the warm air is escaping at the highest levels (exfiltration) to break the cycle.
How to Apply Window Film to Mimic Double Glazing for Under $50?
Single-pane windows, common in older houses, are a major source of heat loss through conduction. The glass itself gets cold and radiates that coldness into the room, while also allowing heat to escape directly through it. While replacing windows with modern double or triple glazing is effective, it’s a major expense. A highly effective and affordable alternative is to install interior insulating window film. This thin, transparent plastic film is applied to the inside of your window frame, creating a sealed pocket of air between the film and the glass.
This trapped air layer acts as an insulator, much like the gap in a double-glazed unit. It dramatically reduces the amount of heat that can conduct through the window, keeping the inner surface (the film) warmer to the touch and preventing cold drafts generated by the glass surface. The key to success is creating a perfectly sealed air gap. The film must be attached to the frame, not the glass itself, using the double-sided tape provided in the kit. Once applied, a hairdryer is used to shrink the film, removing any wrinkles and making it taut and nearly invisible.
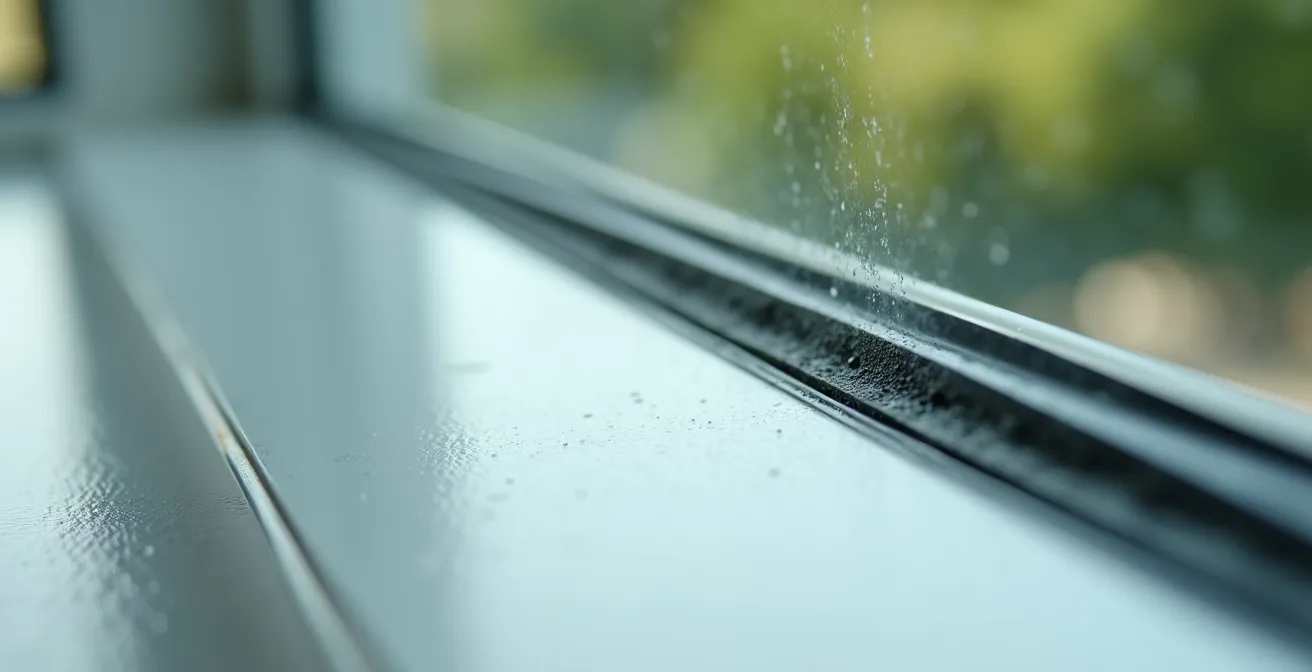
As the image above illustrates, the goal is to create a distinct, sealed layer. This simple DIY project can be completed in an afternoon for a fraction of the cost of new windows. From a cost-benefit perspective, it offers one of the best returns on investment for immediate comfort improvements.
Comparing this small investment to other low-cost energy-saving measures shows its clear value. An analysis of various energy efficiency investments highlights how quickly window film can pay for itself through reduced heating costs.
| Investment Option | Initial Cost | Energy Savings | Payback Period |
|---|---|---|---|
| Window Film (Low-E) | $30-50 | 15-30% on cooling | 3 years |
| Draft-proofing Tape | $20-40 | 5-10% | 1-2 years |
| Thermal Curtains | $40-50 | 10-15% | 2-3 years |
Constant Low Heat vs On-Off Blasting: Which Saves More Money?
The debate between leaving the heating on low all day versus only turning it on when you’re home is a common one. The most cost-effective strategy depends entirely on your home’s thermal mass and insulation level. Thermal mass refers to the ability of your building’s materials (walls, floors) to absorb, store, and slowly release heat. Older houses with thick stone or brick walls have high thermal mass, while timber-frame houses with less dense materials have low thermal mass.
For a high thermal mass home (stone, brick), a “low and slow” approach is often more efficient. It takes a significant amount of energy and time to heat up these dense walls. If you let them get completely cold, your boiler will have to work extremely hard for a long time to bring the entire structure back to a comfortable temperature. This intense “blasting” of heat is often less efficient than maintaining a constant, low baseline temperature. The stored heat in the walls acts as a buffer, radiating warmth back into the room and providing a more stable, comfortable environment.
Conversely, for a low thermal mass, poorly insulated home (like a drafty timber-frame house), the “on-off” strategy can be more economical. These homes lose heat very quickly. Leaving the heating on when you’re out means you are constantly paying to heat air that is rapidly escaping. In this scenario, it’s better to turn the heating off when you’re away and only use it when you need it, accepting that the house will cool down quickly. A programmable thermostat is essential here, allowing you to turn the heat on 30-60 minutes before you arrive home. The key is to avoid heating an empty, leaky house.
- Set nighttime temperature to a setback of 15-16°C (59-61°F) instead of turning the system completely off.
- Program your thermostat to begin warming the house 30 minutes before your wake-up time.
- For high thermal mass (thick stone/brick walls): Use a ‘low and slow’ constant heating approach.
- For low thermal mass (timber-frame, poor insulation): Consider on-off cycles, heating only during occupied hours.
- Monitor your home’s response over a week and adjust the setback temperature and timings accordingly.
The Ventilation Mistake That Makes Your Warm House Feel Cold and Damp
It sounds counter-intuitive, but a lack of proper ventilation in winter can make your house feel colder and damper, forcing your heating system to work harder. Everyday activities like cooking, showering, and even breathing release a significant amount of moisture into the air. In a well-sealed or drafty-but-unventilated old house, this moisture gets trapped. The result is high indoor humidity, which has two negative effects on your comfort and energy bills.
First, humid air feels colder than dry air at the same temperature. This is the “damp cold” phenomenon that seeps into your bones. Your body perceives the temperature as lower because the moisture in the air conducts heat away from your skin more effectively. Second, water vapor holds a lot of thermal energy. Your heating system must expend extra energy to heat up this water vapor in the air, in addition to the air itself. The “damp cold” phenomenon occurs when high humidity makes air feel colder at the same temperature, forcing you to turn up the thermostat for a feeling of warmth that dry air would provide at a lower setting.
The common mistake is to keep windows shut tight all winter, thinking you are preserving heat. The correct strategy is “purge ventilation”: a rapid, targeted exchange of air. Instead of leaving a window cracked open all day (which just lets heat steadily escape), you should fully open windows in high-moisture areas (kitchen, bathroom) for a short, intense period of 5-10 minutes. This quickly expels the stale, humid indoor air and replaces it with colder but much drier outdoor air. Because the period is so short, the thermal mass of your walls, floors, and furniture doesn’t have time to cool down. Once you close the windows, this stored heat quickly warms up the new, dry air, leaving you with a more comfortable and energy-efficient environment.
Action Plan: The Purge Ventilation Technique
- Open windows fully in the kitchen and bathroom for exactly 5-10 minutes. This is your primary target.
- Create cross-ventilation by opening windows on opposite sides of the house to accelerate the air exchange.
- Close internal doors to rooms not being ventilated to concentrate the airflow where it’s needed most.
- Immediately close all windows after the time period. The goal is to swap the air, not cool the building’s structure.
- Repeat this daily in high-moisture areas (kitchen after cooking, bathroom after showering) to prevent humidity build-up.
When to Bleed Your Radiators: The Sign That You Are Wasting Gas
A hydronic heating system (one that uses hot water and radiators) is only efficient if water can circulate freely. Over time, air can get trapped in the system, accumulating at the highest points—which is typically the top of your radiators. This trapped air acts as a blockage, preventing hot water from filling the entire radiator. The result is a classic symptom: the radiator is hot at the bottom but cold at the top. When this happens, you are wasting gas because your boiler is working to heat water that isn’t effectively transferring its heat to the room.
Bleeding the radiators is the process of releasing this trapped air. It’s a simple but essential maintenance task that any homeowner or tenant can perform. The tell-tale sign that bleeding is needed is an audible gurgling or bubbling sound from your pipes and, most definitively, a noticeable temperature difference on the radiator’s surface. The top section will feel lukewarm or completely cold, while the bottom pipe feeding the radiator will be hot.
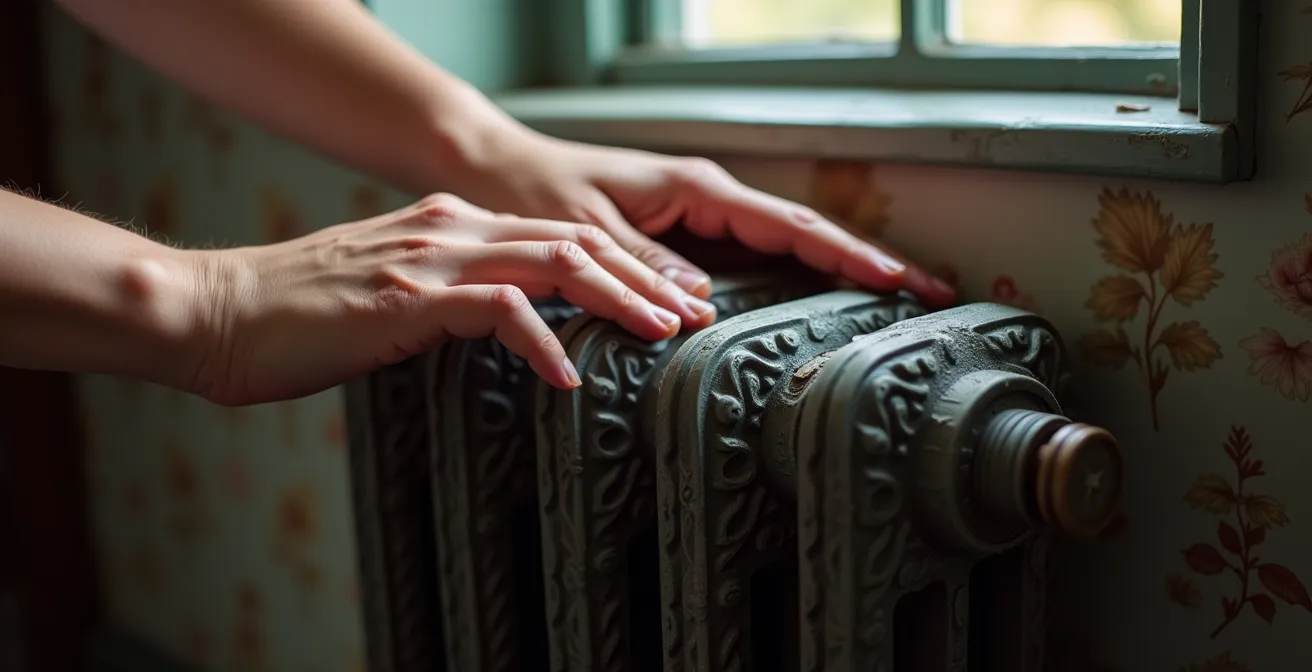
The process is straightforward. First, turn off your central heating system to stop water from circulating and allow the radiators to cool down to prevent burns. Using a radiator key (a small, inexpensive tool available at any hardware store), you slowly open the small bleed valve at the top of the radiator. You’ll hear a hissing sound as the trapped air escapes. Keep the valve open until the hissing stops and water begins to drip out, then quickly close it. Repeat this for every radiator in your home, starting with the one furthest from the boiler.
After bleeding, it is critical to check your boiler’s pressure gauge. Releasing air will have caused the system pressure to drop. It should typically be between 1 and 1.5 bar when the system is cold. If it’s too low, you’ll need to repressurize the system using the filling loop, as per your boiler’s manual. A correctly bled and pressurized system ensures every radiator heats up fully and evenly, maximizing the efficiency of every therm of gas you burn.
How to Use Any Window for Free Solar Heating
While stopping heat loss is the first priority, the second is maximizing free heat gain. This is where passive solar gain comes in—using the sun’s energy to warm your home at no cost. Many people assume this is only relevant for large, south-facing windows, but in an old house, every window can be a small, strategic heater if you manage it correctly. The key is to understand the sun’s path and how it interacts with your home throughout the day and the seasons.
During winter, the sun is lower in the sky, allowing its rays to penetrate deeper into your home. East-facing rooms are perfect for capturing morning warmth. By opening the curtains wide on these windows from sunrise until mid-morning, you can capture significant solar energy that reduces the load on your heating system as the day begins. This is particularly valuable as east-facing rooms can often feel chilly in the afternoon.
Similarly, west-facing rooms are ideal for capturing afternoon sun, which can be surprisingly strong even on a cold day. Keeping these curtains open from early afternoon until sunset allows you to “top up” the heat in your home just before the coldest part of the night. South-facing windows, of course, provide the most consistent solar gain throughout the day. The strategy is simple but effective: always open curtains and blinds on any window that is receiving direct sunlight, and close them as soon as the sun moves away. Closing them acts as an extra layer of insulation, trapping the heat you’ve just gained. This behavioral change costs nothing but can significantly impact your home’s ambient temperature and reduce your thermostat’s workload.
The Psychological Hack: How Natural Light Makes a Room Feel Warmer
Beyond the direct thermal energy provided by sunlight, natural light has a powerful psychological effect on our perception of temperature. Bright, naturally lit spaces are perceived as being warmer and more comfortable than dark, artificially lit rooms, even if the air temperature is identical. This is a cognitive shortcut our brains make, associating brightness and sunlight with warmth.
Leveraging this psychological hack is a free and effective way to improve your thermal comfort. By actively following the sun’s path through your home during the day, you can spend time in the brightest rooms, which will make you feel more comfortable at a lower thermostat setting. For example, if you work from home, consider setting up your workspace in an east-facing room in the morning and moving to a west-facing room in the afternoon. This simple behavioral change can reduce the temptation to nudge the thermostat up a degree or two. Research consistently demonstrates that bright naturally lit rooms feel warmer at the same air temperature, a key factor in perceived comfort.
This effect is amplified when combined with the actual passive solar gain. A case study on homes in southern climates found that families who optimized their daily living patterns around natural light reported feeling more comfortable at lower thermostat settings. Some achieved a 15-20% reduction in heating costs simply through behavioral changes aligned with solar exposure. By “chasing the sun” indoors, they capitalized on both the physical heat and the psychological perception of warmth, creating a more comfortable environment while saving money. This strategy costs nothing to implement and works in tandem with all other heat-loss prevention measures.
Key takeaways
- The “stack effect” is the primary driver of drafts, pulling cold air in from the bottom of your house as warm air escapes from the top.
- A “Fabric First” approach—prioritizing air sealing and insulation—offers a faster and higher return on investment for comfort and savings than active generation systems like solar.
- Managing indoor humidity through “purge ventilation” is crucial to eliminate the “damp cold” feeling and improve heating efficiency.
The “Fabric First” Rule: Why Insulation Beats Solar for Immediate Savings
When considering long-term investments for an old house, many homeowners are tempted by modern technologies like solar panels. However, from a purely financial and thermal comfort perspective, this often puts the cart before the horse. The most robust principle in building science for energy efficiency is “Fabric First.” This rule dictates that you should always prioritize improving the building’s thermal envelope—its insulation, windows, and air-tightness—before spending money on generating your own energy.
Think of your house as a bucket you’re trying to keep full of hot water. If the bucket is full of holes (poor insulation, drafts), your first and most cost-effective action is to plug the holes, not to buy a bigger, more expensive tap to fill it faster. Investing thousands in solar panels to power a heating system that is fighting a losing battle against constant heat loss is a fundamentally inefficient strategy. The return on investment for improving the “fabric” is almost always faster and greater, both in terms of financial savings and, crucially, in immediate, noticeable comfort.
Fabric First approach means spending money on insulation, draft-proofing, and window improvements before considering active solar, as the ROI is almost always faster and greater for thermal comfort.
– Building Science Expert, Stack Effect and Energy Efficiency Study
An attic insulation upgrade, a professional air sealing package, or even the low-cost window films discussed earlier will deliver immediate, 24/7 improvements to your home’s ability to retain heat. These are one-time investments that pay dividends every single day. Solar panels, on the other hand, only generate energy when the sun is shining, and their financial payback period is often significantly longer.
This data-driven comparison clearly shows where your investment will have the most immediate impact. Prioritizing fabric improvements guarantees a warmer home and lower bills, creating a highly efficient foundation that might one day make a smaller, less expensive solar installation a viable and logical next step.
| Investment Type | Typical Cost | Annual Savings | Payback Period | Comfort Impact |
|---|---|---|---|---|
| Attic Insulation (R-49) | $1,500-3,000 | 20-30% | 3-5 years | Immediate |
| Air Sealing Package | $1,000-2,000 | 10-20% | 2-4 years | Immediate |
| Window Improvements | $500-1,500 | 10-15% | 3-5 years | Immediate |
| Solar Panels (5kW) | $10,000-15,000 | Variable | 7-10 years | Indirect |
By systematically applying these technical, low-cost strategies, you can take control of your home’s thermal performance. The next logical step is to perform a simple audit of your own property, identify the biggest opportunities for improvement, and implement these changes to enjoy a warmer, more comfortable, and less expensive winter.